Oracle APEX Automations enable applications to utilize the Oracle job scheduler from a Graphical User Interface using a package built on top of the dbms_scheduler called APEX_AUTOMATION. Managing scheduled jobs and viewing the internals of the job scheduler can be a complicated process. Oracle APEX automations make it a breeze.
Most businesses need the ability to receive alerts or update records when employees are terminated, or send notifications to the marketing team when a new business lead comes in. Automations are the way to handle these items. There are limitless capabilities using PL/SQL code together with data and transforming that data. At a high-level overview, automations are a set of steps that can be run on a schedule and triggered based on the query results that are retrieved
Steps to Create Your First Simple Automation
In this demonstration, we will create an automation to insert records into another table when an employee leaves the company. The demonstration below requires that you have a data set that has an employee table with information about the employee and a column containing termination date data. In our example, that column is entitled: termination_date
Within the Application Builder:
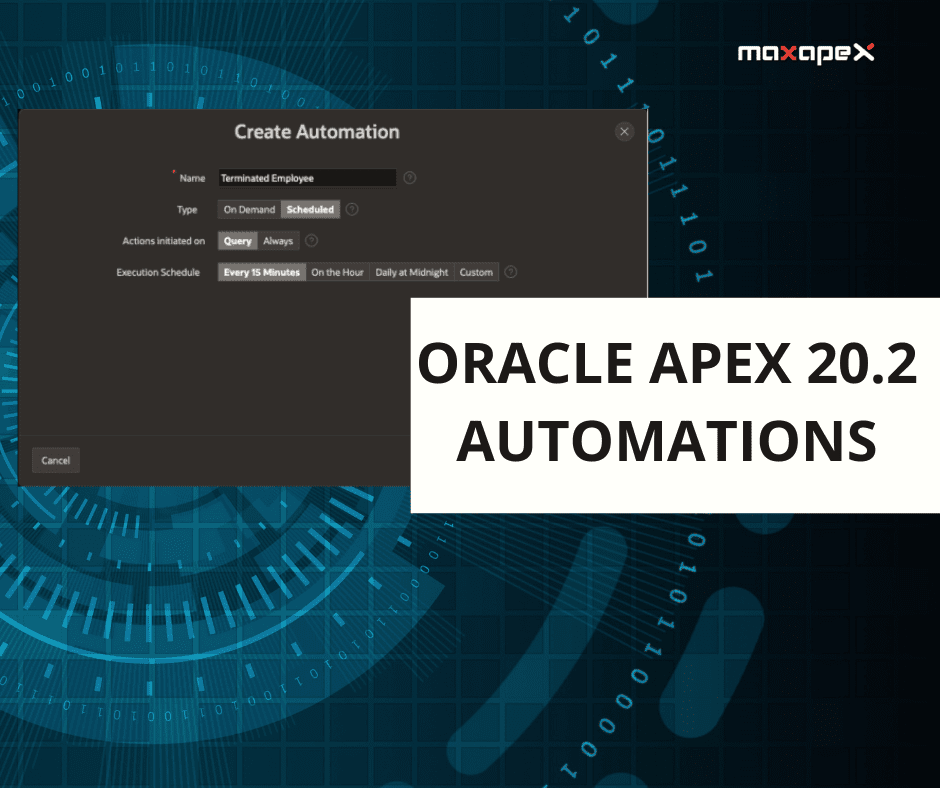
- Navigate to Shared Components > Automations > Create
- Fill in the values as shown below to create “Terminated Employee” automation. You can customize the schedule as needed or use the basic built-in features. Make sure to update the schedule to the settings you need. For this demonstration, you can simply set it to 15 minutes so that you can test the automation every 15 minutes
]
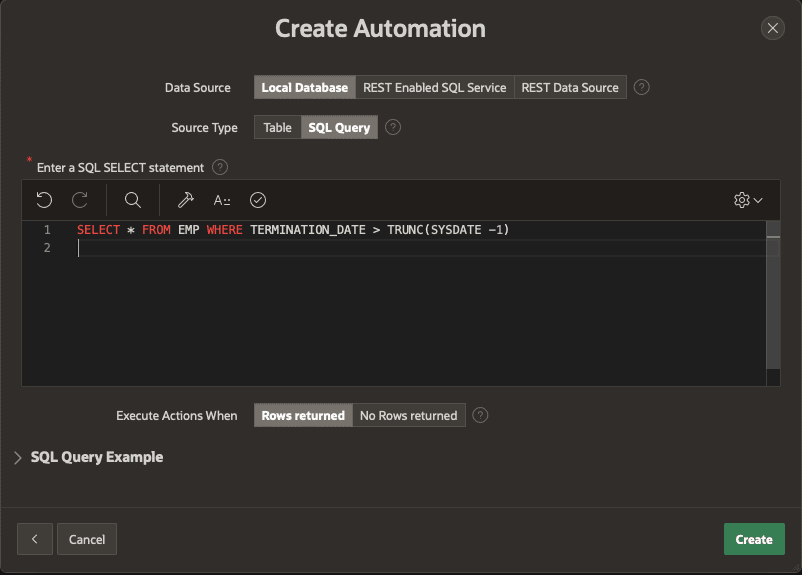
Next, we will create the data source for the automation:
- Fill in the values as shown below using the following query and select Create
SELECT * FROM EMP WHERE TERMINATION_DATE > TRUNC(SYSDATE -1)
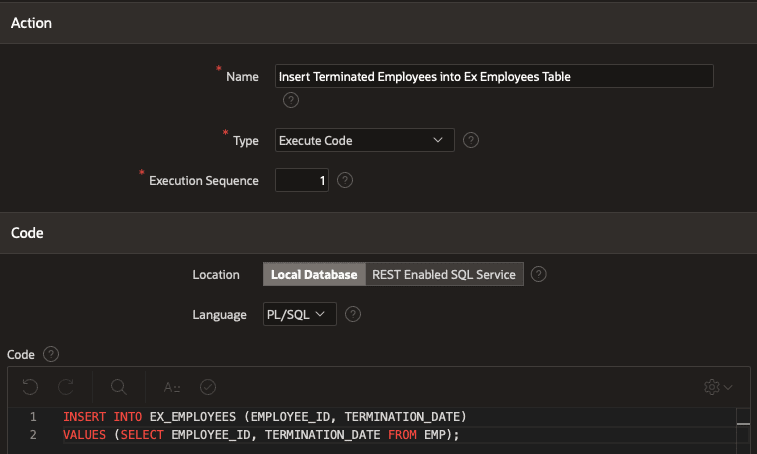
You have now set up the framework for the automation, and now we can proceed to define the action that initiates the automation. You’ll notice the name and settings you selected, and the static name is generated when manually calling the automation via the APEX_AUTOMATION PL/SQL package.

Select Add Action underneath the Actions section to begin imputing your code that will be performed when the scheduled time occurs.
You have now completed the Automation and can save the changes. The Automation is DISABLED on creation, so you will need to Enable the Automation by editing the automation and updating the Schedule Status underneath settings to Active. Remember, you set the schedule to a 15-minute schedule above, so make sure to update your record set if you are testing to have a date greater than SYSDATE – 1
As you can see you can combine code for one process into one automation. You can add multiple actions to an automation, so if you need to terminate an employee as well as make sure that they have filled out the termination paperwork, you can simply add another action and then have that action processed.
ADVANCED OPTIONS
As you can see creating an automation is an easy and self-explanatory process. Everything with Oracle APEX comes with an advanced option for those who want to get a little bit more functionality out of the automation feature set. Below are some examples of other features
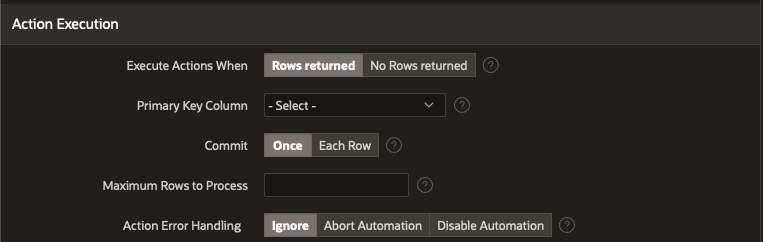
Action Execution
- Execute Actions When –Ability to run the automation if your query returns results
- Primary Key Column –Useful when debugging logs of automation for row set
- Commit –Increase commit rate to pre-row or all row sets at once
- Maximum Rows to Process –Will stop processing after row set maximum is reached
- Action Error Handling – Useful for aborting, or disabling the automation if you need to make sure all components of the automation are working as expected
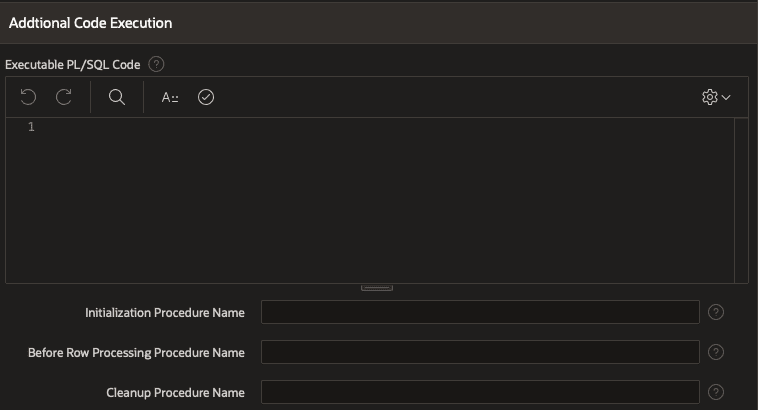
Additional Code Execution
- This is a beneficial area to do more/less a pre-step or post-step, or even before each row is processed check. Let’s say we wanted to verify that the employee submitted their laptop & badge before leaving the company. You can enter the procedure stored in the database in the Before Row Processing Procedure Name to run the name of the PL/SQL box and provide the code in this region
This is only the beginning of the capabilities of what Oracle Automatons can do. You can expose the PL/SQL to run and extract data from websites, send text messages, or even POST messages using Oracle’s other features. Not only can you post and gather data, but the automation can work in reverse. If you want to run the automation based on something changing on the website, you can set up a REST Data Source and return the record set from a web interface.
Oracle APEX automatons simplify the management of scheduler jobs and provide a high-level interface for quickly scheduling jobs/requirements that your business needs to begin the automating of redundant and busy work. Your business will be stunned by the simple yet user-friendly setup of Oracle Automation.


What do you think?
A very nice article.
When I try to create an automation I get ‘ORA-01031: insufficient privileges’
Hi Geert,
Did you solve the issue? We are facing the same error after putting the schedule status to ‘Active’
Hi Robin,
MaxAPEX has granted me the rights to create a schedule. After that it was solved.
Great read! Thank you for such useful insights. Visit here for latest tech courses on <a href=”https://www.gologica.com/course/oracle-apex/”>ORACLE APEX ONLINE TRAINING</a>