Tired of moving massive datasets just to run your Python models? It’s a common headache for data scientists, dragging GBs of data out of the database just to process it locally.
There is a better way. Oracle Machine Learning for Python lets you harness the speed and scale of the Oracle Database right from your favorite Python environment. Instead of bringing the data to the code, you bring the code to the data.
But fair warning: This is not a simple pip install. If you want to know how to install the OML4Py server, this is a deep dive into setting up the component directly within your database infrastructure.
Ready to build a robust, high-performance ML platform? Just follow these steps derived from a real-world Oracle Machine Learning for Python setup. Let’s get started.
Phase 1: Compile and Install Python in Oracle Database ($ORACLE_HOME)
OML4Py requires a specific, shared installation of Python within your Oracle environment. We aren’t just downloading an installer here; we are going to build Python 3.13.0 from the source to ensure it works seamlessly with your database.
Note: OML4Py requires Python 3.12.6 or above
Install System Dependencies (As Root)
Before we compile anything, we need to prep the system libraries. Log in as the root user and install the required development packages using provided command:
sudo yum install perl-Env libffi-devel openssl openssl-devel tk-devel xz-devel zlib-devel bzip2-devel readline-devel libuuid-devel ncurses-devel Build Python from SourceNext, we download and compile Python specifically into a directory inside your designated $ORACLE_HOME.
Download and Prepare
# Download Python Source
wget https://www.python.org/ftp/python/3.13.0/Python-3.13.0.tgz
# Create the Target Directory
mkdir -p $ORACLE_HOME/python
# Extract the Source
tar -xvzf Python-3.13.0.tgz –strip-components=1 -C $ORACLE_HOME/python
Compile and Install
Now, navigate to the folder, configure the build, and install
cd $ORACLE_HOME/python
./configure –enable-shared –prefix=$ORACLE_HOME/python
make clean; make
make altinstall
Polish the Installation
A fresh installation usually comes with an outdated pip, so let’s fix that and create a convenient shortcut (symlink) for python3 using following commands
cd $ORACLE_HOME/python/bin
python3 -m pip install –upgrade pip
ln -s python3.13 python3
Phase 2: Configure Oracle Environment Variables for Python
This part is critical. If you skip this, the database won’t be able to find your new Python tools. You need to set these variables inside your bash profile so everything connects properly
export ORACLE_SID=FREEexport ORACLE_BASE=/opt/oracleexport ORACLE_HOME=/opt/oracle/product/26ai/dbhomeFreeexport PYTHONHOME=$ORACLE_HOME/pythonexport PATH=$PYTHONHOME/bin:$ORACLE_HOME/bin:$PATHexport LD_LIBRARY_PATH=$ORACLE_HOME/lib:$PYTHONHOME/lib:/lib64:$LD_LIBRARY_PATHexport PYTHONPATH=$ORACLE_HOME/oml4py/modules

Phase 3: Install Required Python Packages to the OML4Py Module Directory
The OML4Py server runs inside the database and needs its own specific set of data science libraries installed directly into its module path. First, navigate to the module path:
cd $ORACLE_HOME/oml4py/modules
Create a requirements.txt file with these exact versions to ensure compatibility:
pandas==2.2.3setuptools==70.0.0scipy==1.14.1matplotlib==3.10.0oracledb==2.4.1joblib==1.3.2scikit-learn==1.6.1numpy==2.1.0 Now, Use the following command to install all packages directly into the OML4Py module directory: pip3.13 install -r requirements.txt –target=$ORACLE_HOME/oml4py/modules
Bonus Tip: If you need to add a single package later (like openpyxl), always use that same –target flag!
Example: pip3.13 install openpyxl –target=$ORACLE_HOME/oml4py/modules
Phase 4: Run OML4Py Server Configuration Scripts (pyqcfg.sql)
Now comes the moment of truth: integrating Python with the Oracle Database via the installation scripts. But first ensure that you have Perl 5.8 or higher installed using the following command perl –version
After verifying that you have the required perl version navigate to the server installation directory and run the scripts:
cd $ORACLE_HOME/oml4py/server
You need to run the installation script in the Container Database (CDB) first, and then in the Pluggable Database (PDB).
Commands For CDB
sqlplus / as sysdba
SQL> spool install_root.txt
SQL> show con_name
SQL> @pyqcfg.sql SYSAUX TEMP
SQL> spool off;
SQL> Exit
Commands For PDB
sqlplus / as sysdba
SQL> spool install_pdb.txt
SQL> alter session set container=xepdb1;
SQL> @pyqcfg.sql SYSAUX TEMP
SQL> spool off;
SQL> Exit
Verify the OML4Py Installation
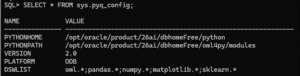
Check if the configuration is active by querying the config view:
SQL> SELECT * FROM sys.pyq_config;
Expected Output:
Phase 5: Create Your OML User and Grant PYQADMIN Privileges
Finally, you need a dedicated database user to run your OML4Py jobs.
This user will be granted the special PYQADMIN role and other necessary privileges. We will use the pyquser.sql script located in the same server directory.
cd $ORACLE_HOME/oml4py/server
For CDB
sqlplus / as sysdba
@pyquser.sql oml_user_cdb USERS TEMP unlimited pyqadmin
FOR PDB
sqlplus / as sysdba
alter session set container=xepdb1;
@pyquser.sql oml_user_pdb USERS TEMP unlimited pyqadmin
Grant Power:
Give your user (e.g., oml_user_pdb) the ability to create models and text indexes by giving the following priviledges:
GRANT CREATE SESSION, CREATE TABLE, CREATE VIEW, CREATE PROCEDURE to oml_user_pdb;GRANT CREATE MINING MODEL to oml_user_pdb;GRANT EXECUTE ON CTXSYS.CTX_DDL to oml_user_pdbS;GRANT PYQADMIN to oml_user_pdb;
Congratulations! You have completed the rigorous process of installing and configuring the OML4Py server. Your database is no longer just a storage unit—it is now a powerful, Python-enabled machine learning platform ready for heavy analytical workloads.
Happy coding!
If you require any assistance regarding database management, AI integration, or custom development for your infrastructure, please feel free to contact us.
If you require any assistance regarding automation, please feel free to contact us.