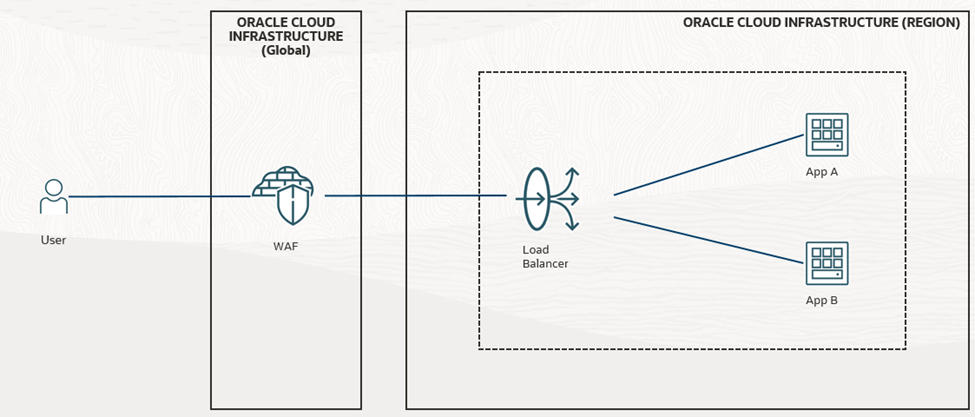
Oracle Cloud Infrastructure (OCI) includes a Web Application Firewall (WAF) service that acts as a reverse proxy in front of your applications. A WAF inspects inbound and outbound traffic flows before they arrive at your origin servers and monitors responses before they leave the server. This extra security layer filters malicious and unwanted traffic with built-in features. OCI’s WAF can manage multiple types of threats:
Origin management – define one or more origin servers for the application being protected.
Access control – granular rules to allow or block traffic based on IP addresses, countries/regions, request headers, or URI patterns.
Protection rules – pre-configured policies (over 250 OWASP-aligned rules) to defend against common attacks such as SQL injection and cross-site scripting.

To know about supported Protection Rules, click here.
Unlike a traditional firewall, the OCI WAF scales elastically and offers centralized rule enforcement across your tenancy. It sits in front of your load balancers or endpoints, inspecting requests and responses, and then forwards legitimate traffic to the origin. The following sections present a step-by-step implementation based on Oracle’s official guidance and practical walkthroughs.
Prerequisites
To begin using the WAF service, you must have the following available:
- Ensure that you have the Required IAM Service Policy permissions.
- We recommend using a separate compartment for the WAF policy to facilitate easier and more secure management.
- A main webapp domain.
- IP address of the LBaaS or other public-facing endpoint of the application.
- The WAF service only supports traffic on ports 80/443; however, after requests reach the WAF on ports 80/443, we’re able to send the requests to your origin server on any port necessary
Step 1 – Create a WAF policy zone
- Select the region and compartment where the policy should be maintained (there is no constraint around the WAF co-existing with Load Balancer or other application resources in Oracle Cloud Infrastructure.
- Open the navigation menu and select Identity & Security. Under Web Application Firewall, select Policies.
- Click Create WAF Policy.
- Look at the bottom of the Basic Information page for the following:
Use legacy workflow here if you need to secure your non-OCI web applications.
- Click the link to display the Create Edge Policy dialog box.
- Complete the following:
- Name: A unique name for the policy.Domains:
- Primary Domain: The fully qualified domain name (FQDN) of the application where the policy will be applied.Additional Domains: (Optional) Subdomains where the policy will be applied.
- Origin Name: A unique name for the origin.URI: Enter the public-facing endpoint (IPv4 or FQDN) of the application.HTTPS Port: The port used for a secure HTTP connection. The default port is 443.HTTP Port: The HTTP port the origin listens on. The default port is 80.Headers: (Optional)
- Header Name: The name displayed in the HTTP request header and the header value that can be added and passed to the origin server with all requests.Header Value: Specifies the data requested by the header.
- Tags: If you have permissions to create a resource, then you also have permissions to apply free-form tags to that resource. To apply a defined tag, you must have permissions to use the tag namespace. For more information about tagging, see Resource Tags. If you’re not sure whether to apply tags, skip this option or ask an administrator. You can apply tags later.
- Name: A unique name for the policy.Domains:
- Click Create WAF Policy. The WAF Policy overview appears. Expect the policy to become active within 15 minutes of creation.
See Managing Edge Policies for more information.

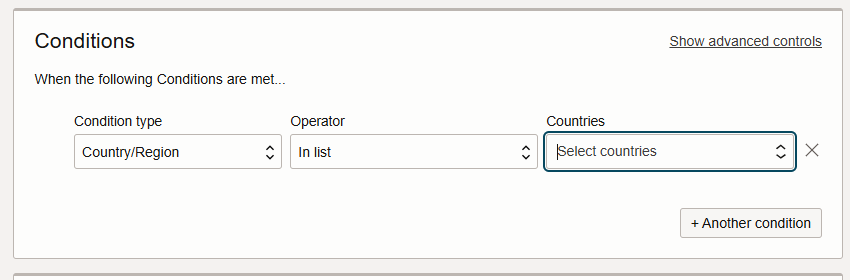
Step 2 – Configure access-control rules
The real power of OCI’s WAF lies in its ability to define custom access rules. In this example, we block all traffic from the United States, except for a specific IP address. The same pattern can be adapted for other countries or IP ranges. To create a rule:
- Open the navigation menu and click Identity & Security. Under Web Application Firewall, click Policies.
- On the Policies page, select the compartment that contains the policy.
- (Optional) Filter the listed policies by name, state (status), policy type (Edge policy), or creation date.
- Click the name of the Edge policy to which you want to add an access rule.
- On the policy details page, under Edge policy, click Access control.
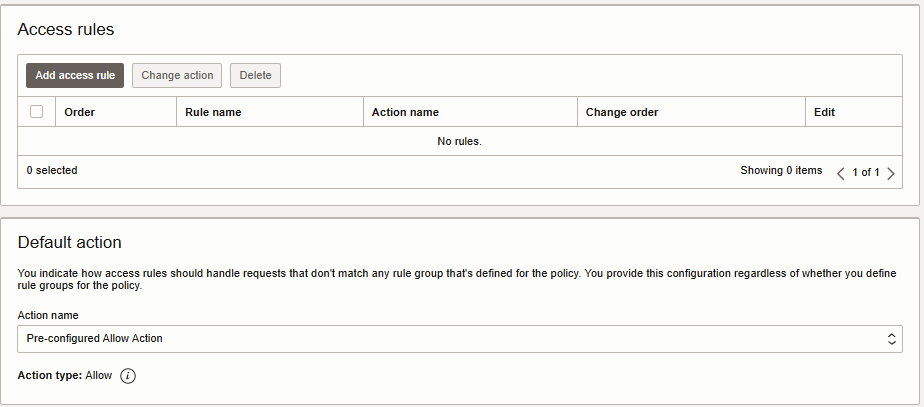
- Click the Access rules tab.
The Access rules list appears. For more information, see Access Rules for Edge Policies.
- Click Add access rule.
- Provide the following information:
- Name: Enter a name for the access rule.Action: Select one of the following options to determine the response to a request when the rule is matched:
- Log and allow: A log is created for all matched requests, and no further action is taken.Detect only: A detection alert is created for all matched requests, and no further action is taken.Block: All matched requests are blocked, and a browser page for the selected response code is returned.
- Block action: Select the action that’s taken when a matching request is blocked.Block response code: Select a response code that’s returned when the request has been blocked. The response code provides information indicating why the request was blocked. The default response code is 403 Forbidden.
- Redirect status code: Select the status code returned in response to redirect requests from the list.Redirect URL: Enter the URL address to redirect the request to.
- CAPTCHA title: Enter the text for the CAPTCHA page title.CAPTCHA header: Enter the text that appears before the CAPTCHA image (for example, “I am not a robot”).CAPTCHA footer text: Enter the text to display after the CAPTCHA input box and before the submit button.CAPTCHA submit button: Enter the text for the Submit button (for example, “Yes, I am human.”).
- Log and allow: A log is created for all matched requests, and no further action is taken.Detect only: A detection alert is created for all matched requests, and no further action is taken.Block: All matched requests are blocked, and a browser page for the selected response code is returned.
- Header manipulation(s): Complete the following information:
- Action: Select the action to apply to the request.
- Header name: Enter the HTTP header name of the request.
- Header value: Enter the HTTP header value of the request.
- Name: Enter a name for the access rule.Action: Select one of the following options to determine the response to a request when the rule is matched:
- Click Add access rule.
Step 3 – Adding a Firewall to a Web Application Firewall Policy
Add a firewall to a web application firewall (WAF) policy to create a logical link between the policy and an enforcement point, such as a load balancer.
- On the Policies list page, select the WAF policy that you want to add the firewall to. If you need help finding the list page or the policy, see Listing Web Application Firewall Policies.
- On the WAF policy’s details page, under Policy, select Firewalls.
- Select Add firewalls.
- In the Add firewalls panel, enter the following information:
- Firewall name: Enter the name of the firewall.
- Create in compartment: Select the compartment that contains the firewall you are creating.
- Load balancer: Select the load balancer. Select Change compartment to select a load balancer from a different compartment
- Enable WAF logs: Select this option to generate logs that contain WAF security events.
Logging is an option in the Web Application Firewall service. Standard limits, restrictions, and rates apply when enabling the logging features. See Oracle Cloud Infrastructure Logging.
- WAF logs: (Optional) Apply the following configurations to all WAF logs that you enabled. You can update these settings later for individual log files in the log details See Logs and Log Groups.
- Compartment: Select the compartment where the WAF logs reside.
- Log group: Select the log group.
- Log retention: Select the length of time log entries are retained in the log file.
- Show tagging: (Optional) Add one or more tags to the firewall.
If you have permissions to create a resource, then you also have permissions to apply free-form tags to that resource. To apply a defined tag, you must have permissions to use the tag namespace. For more information about tagging, see Resource Tags. If you’re not sure whether to apply tags, skip this option or ask an administrator. You can apply tags later.
- Select Add firewalls.
Key Use Cases
Some of the use cases for a Web Application Firewall.
- Protection against cyberattacks.
- Access Control for Data Privacy Standards
- Integration with existing management systems.
- Bot Management
- Hybrid and multi-cloud protection.
Conclusion
It is essential to protect and monitor a web application against potential threats and secure it from unwanted or harmful traffic. To achieve this, we use a Web Application Firewall (WAF), which prevents malicious traffic from accessing the application.
In this post, I cover an overview of WAF, how to manage WAF in OCI, and some practical use cases. I hope this helps you better understand the concept of WAF in OCI.
Our Services
- Oracle APEX Shared Hosting
- Oracle APEX DedicatedDB Hosting
- Oracle APEX CloudDB Hosting
- Oracle APEX On-Premise support
- Oracle Cloud Infrastructure Support
MaxAPEX team handled the support request well. A prompt and detailed response was provided, addressing the specific concern, explaining the required steps, and providing additional information. Thank you.
Sopport staff was informative, patient, and clearly knowledgeable in his field. As always, the support was very comprehensive.
For almost 7 years, the support team and even other teams like sales, are very cooperative and very professional.
All of the guys provided great support for our server migration. We appreciate the hard work and dedication.
Awesome, in a very short timeframe, my problem was resolved, even on Saturday night
Thank you so much for the fast response and the help that you always provide on MaxAPEX.
The whole team is amazing. I had opened 5-7 tickets in span of 2 days, and all of them were treated promptly and efficiently. Thank you all.
The support team was very patient and kind; they really understood the urgency of this requirement and did very well. I’m very satisfied with the support team’s assistance and support.
I was very satisfied with the way my request was handled in a very timely manner.
Great Job guys, app was working again not long after my request. Thanks
This ticket was handled VERY promptly and extremely professionally. Problem solved in no time! What a joy to have such great support!
The support team stayed with the problem and resolved it for me on the same day.
Thank you so much for your help! I really appreciate the time and effort you put into solving my issue.
Thank you, support team, for the great work! I apologize for the disruption caused by restarting the server while you were assisting me.
I don’t know who did what, but the hardware problem was fixed quickly with minimum downtime. Thanks.
Great. It is so nice to work with someone who knows their stuff.
Everyone on the MaxAPEX support team was extremely diligent in providing complete and fast service. Specifically, Saad took charge of coordinating the entire process and was attentive in answering my questions and fulfilling all my requests. I am very pleased with everyone and the service.
We really appreciate you scheduling this work for us late on a Friday!
I asked a lot from MaxAPEX this weekend, but as always, they delivered great work. There is only one APEX hosting company for me, and that is MaxAPEX. Great work!
Couldn’t have been a bigger help for us. Quick intervention with a solution that prevented five of our employees from dropping out of work.
Excellent service from the team. They are super responsive, helpful, and patient. Every response gives me what I need, and every change is done correctly. This made our migration quick, reliable, and a great experience. Thank you.
The ticket was answered promptly and correctly – can’t ask for more than that.
Perfect. The support team informed me as soon as they started working on it, so I immediately knew what was happening, and they also notified me once it was resolved.
Very good. Their suggestion was exactly what I needed to recover the overwritten values.
These events are worrying since we do not know for sure how long they will take; however, they handled it very well and the service was back quickly.
The response time was so fast. Like, your total duration tracker is wrong because it took me longer to send an email than anything else. Super fast and resolved my issue. Thank you so much!
To get into the system and ensure the solution is really working, it requires outstanding support commitment.
Very fast reply. The speed compensates the fact that not all indexes that needed rebuild got the rebuild in the first go.
Incredible fast for a low prio ticket. Always a pleasure to work with your support!
As always the support is great! Fast and efficient. Thanks with 5 *****
Thanks a lot for perfect quality, speed, and communication – couldn’t be any better
Their support staff’s response was fast, and they solved my problem more quickly than I expected.
Support team guided me very well during the upgrade/migration. They answered my questions correctly and did their job well.
The technical support team did the job quickly and with quality. I am very satisfied with their work.
All your staff were responsive and helped to solve the problem in a reasonable time.
Perfect, I am very satisfied, professional communication with me.
I would like the support team to contact me and tell me what the problem was. I have been in IT for over 30 years. 🙂
These events are worrying since we do not know for sure how long they will take; however, they handled it very well and the service was back quickly.
Excellent, keep up the good work with the support. You are one of the best I have worked with as an Oracle architect.
Very fast response to the ticket, resolved the issue in much less time than I was expecting.
It was an easy task, but what I really appreciate is that the issue was solved in minutes. Keep up the good work!
The technical staff was able to provide me with solutions to my problem, for which I am very grateful. Well done!
Very fast, worked on first try, really very happy with the support team. Thank you again!
I continue to be impressed by the always excellent support provided by MaxAPEX. Thanks again.
Quality services and responsive professional support are the advantages I have with MaxAPEX. THANKS
I can’t say enough good things about MaxAPEX, I’ve relied on their hosting services for several years now and they’ve simply never let me down. Whenever issues have arisen, their support team is always incredibly prompt and helpful in their responses. I use their services to manage a portfolio of cloud-based databases and apps, as well as some on-premise management too, and their affordable support has removed so much of the technical overheads and allowed me/my teams to focus on development. If you’re in the market for APEX hosting, simply look no further.
Excellent service, high availability and very good price-value ratio. 100% recommended
Very nice company, excellent service, very good price-value ratio and amazing amazing support!
MaxAPEX Team is Always Ready and on the Time.
I have asked a lot from MaxAPEX this weekend but as always great work. There is only one Apex hosting company for me and that is MaxAPEX. great work!
I continue to be impressed by the always excellent support provided by MaxAPEX, thanks again.
I appreciate both the quickness and the proactive nature of how my MaxAPEX tickets are resolved. You clearly have a well qualified Oracle staff.
I am always impressed by how much time your support team are prepared to spend on my problems. Well done, as usual!
Great. It is is so nice to work with someone who knows their stuff.
Great response time and very to the point responses. very much appreciated.
You guys are awesome! Thank you for always providing such wonderful speedy support.
Gave a great answer and ticket could be closed immediately.
Excellent,
I always can depend on MaxAPEX for Super Fast Response and to the point response.
Excellent response time and got to the solution quickly. Thank you.
As soon as I clarified which schema I was having trouble accessing, the connection information was sent to me with a screen shot of exactly how to set it up. Excellent!
Very quick and adequate response! Great support, as ever with MaxAPEX.
Very prompt and to the point which is great, thanks.
Support on this ticket was excellent. The help on this ticket made me feel sure MaxAPEX was an excellent choice.
Quick response to my request, understood my issue and fixed it on the spot. Great work, thanks for your help
Outstanding response time! He handled this request quickly and completely. Excellent support. Thank you
Just did a great job – thanks. Please keep it up!
It is solved now, very happy with the support. Keep up the good work.
I think it is great how MaxAPEX responses to my tickets, even in the evening and during the weekends.
Great support, gave me information to fix a performance issue.
We are very happy to using max apex hosting. they are support very nice and prompt. i recommend APEX user to use their hosting

MaxAPEX support is very good. I have never experienced a situation where they have not been able to help or where the work was not completed very quickly.
Excellent service, full cooperation of support staff and good cloud performance.
In mid-2013 I started looking for a hosting service that could house my project of serving small businesses with specialized system solutions developed on Oracle Apex that meet the need of this market share. I found Maxapex and since then we have established this partnership with excellent cost benefit and high quality services available. Thank you Maxapex for the excellent services provided over these 6 years.
I’m glad I decided to work with you. I never have any problem at all. Thanks so much for doing a great job!

I Have been using Maxapex Service since couple of years. The most thing that attracted me, their instance support and response at any time. Hope to continue this support in future in more improve way.

We appreciate the incredible support MAXAPEX team have provided for us.
We got help with things like that linux configuration, establishing odbc connection that are not strictly related to server hosting. This is the best value for money service on this area.

Maxapex is the perfect choice for hosting Oracle Apex. The support service is speedy and responsive. We did not have a situation where they could not help. You can quickly change your tariff plan to the most suitable one. Server uptime is excellent. We did not have a situation when our business was suspended.

MaxAPEX , really facilitate my start with apex by making it Jump , the team is very helpful and understanding people , ‘I’ve passed more than 3 years with max apex and i feel happy with their support and their services

Hi, my name is Roberto Párraga. I’m developer in Oracle Apex with Oracle Database XE.
My expririence with MaxAPEX is successfully, because helpme to developer and deploy successfully my applications.
The technical support is excellent because my questions got quicly responses.
The stability of the hosting service and the continuous it’s wanderfull, 24/7.
In abstract, I recommend MaxAPEX Hosting for deploy applications developed in Oracle ApeX.
We found MaxAPEX’s technical support team very cooperative, quick & responsive. Hosting services are very much reliable, we never even think about switching to another company.

We have been using Oracle APEX hosting from MaxAPEX for almost 7 years now. I can recommend it as the service, level of expertise and support is really good. We host several Apex web applications with MaxAPEX for our customers that are mainly schools. The users and schools are depending on our Apex Apps with MaxAPEX to execute quality checks which are needed by the Ducth law. An other web app helps teachers during class to track, help and administrate students. As you can imagine it is very important for us that the MaxAPEX servers are fast and reliable which they are. Keep up the good work MaxAPEX.

One of the best oracle apex hosting i have ever used. You guys rock, very fast and active when it comes to ticket solving. Keeo up the good work. I have recomended to many Colleagues and customer about maxapex.

We looked for a company who offers APEX hosting about 2 years ago. We found MaxAPEX and were suprised about the portfolio and the pricing. So we started to use their platform with our CRM system developed on Oracle APEX.
We rate the availability, the update policy and the speed/quality of the support with five stars.
Thank you very much!
Steven Ponndorf
Excellent company!
Great service! are fast and efficient … Congratulations!

I am a MaxAPEX customer for several years now. My company inventory, stock control and invoicing system done using Oracle APEX is hosted with MaxAPEX. These guys have the best support system and a very reliable up-time. Every upgrade and maintenance is always notified in advance, so our IT team is aware to let the other team members know. My 10/10 recommendation goes to MaxAPEX!!!

I have been using MaxAPex for several years, in various configurations (shared, dedicated etc) and I have never had any issues with the serivce. Further, I find the support very responsive and very good. I have no issues with using MaxAPEX as a platform for my live customers. Using this service just takes away so much Oracle Admin headache etc. I would highly recommend MaxAPEX as a hosting partner for any Apex Applications.
As part of a volunteer organisation, I was looking for a service to help solve a big problem for us which was the hours of admin involved in running a local community centre. Services are affordable and scalable and responses to my questions were swift and the support team have been amazing in helping me get what I needed. Upgrades are managed and as an Oracle partner, these guys ensure we are running the latest and greatest and soon as it’s available. Overall I have been very happy with performance too as well as the option to host within the UK. I have managed in a very short time to release an app to our community where most of the admin is now done by them, we’ve set up over 800 events this year, cut invoicing down from one day to 15 mins per quarter and automated several other processes. We have integrated with Stripe and Twilio too!
We have been working with MAXAPEX for approximately 5 years. We have 3 mission critical applications operating in their infrastructure. The service offered by MAXAPEX has been optimal for our needs, and has allowed us to grow as we have required. Their support is excellent, and has allowed us to really concentrate on satisfying the needs of our business.

I have used MaxAPEX for over ten years now and found them to be both practical and extremely reliable. Equally impressive is their competent and timely response to my occasional questions and service tickets.
As an APEX developer, having full control of an entire Oracle XE instance gives me lots of options and because it is professionally supported by MaxAPEX I never have to worry about Oracle upgrades or new versions. I also appreciate the fact that it is physically located in a data center with fast Internet access both in and out. This is something a small company like mine cannot easily do on our own.
Thanks, MaxAPEX, for providing this valuable service at a cost I can afford.

I have been a MaxAPEX customer since 2015. It is a very stable, reliable, and fast platform. The support is excellent and very timely. It is always updated to the latest versions. In MaxAPEX we have hosted all our systems and we are extremely satisfied, I highly recommend them.