Let us stop for a moment and be realistic. How much of your so-called data science effort is truly spent building models, and how much of it disappears into the routine task of shuffling .csv or .xlsx files from one place to another?
You already have a clear forecasting strategy in your head, and you even know the exact algorithm you intend to apply. Yet the raw dataset lives in a spreadsheet on a remote server, while your machine learning environment operates inside the Oracle Database with OML4Py.
So what is the usual routine? Download the file, extract it, transform it and load it. Then, finally, begin writing code. That process seems straightforward and simple enough, but it is not necessary.
With Oracle Machine Learning for Python (OML4Py), you can import xlsx to Oracle DB seamlessly. In this OML4Py tutorial, we will show you how to use the database to reach out, grab that file, clean it using pandas, and store it as a native database table—all in one workflow. In this first part of our forecasting series, we are going to build the foundation by transforming a raw Excel file (online_retail.xlsx) into a robust Oracle table.
Step 1: Use a Python Script to Clean and Load Data into Oracle
One of the real strengths of OML4Py is the ability to embed familiar Python logic directly within a database-managed script. Instead of working outside the database and moving files back and forth, you can define everything in one place. In this case, we will build a function named create_online_retail_table.
This function is responsible for three essential tasks that tend to be frustrating when handled with SQL alone.
First, it opens and reads the Excel file straight from the operating system. There is no need for manual downloads or intermediate steps.
Second, it prepares the dataset by removing empty rows. This matters more than it might seem, especially because tools such as the Prophet library do not tolerate missing values very well.
Third, it explicitly sets the data types. Python is flexible with types, sometimes almost too flexible, while Oracle expects a clearly defined format. Aligning those types upfront prevents issues later and keeps the database schema consistent and reliable.
Executing Python PL/SQL Integration with sys.pyqScriptCreate
Execute the following PL/SQL block to save your Python code directly within the database environment.
					BEGIN
sys.pyqScriptCreate('create_online_retail_table',
	'def create_online_retail_table():
    	import pandas as pd
    	import numpy as np

    	# 1. Read the Excel file from the server path
    	df = pd.read_excel("/home/oracle/online_retail.xlsx")

    	# 2. Clean the data: Replace empty strings and drop NaNs
    	df_cleaned = df.replace("", np.nan)
    	df_final = df_cleaned.dropna(how="any")

    	# 3. Explicit Type Conversions to match the Oracle Signature
    	# This prevents type mismatch errors later on!
    	df_final["CustomerID"] = df_final["CustomerID"].astype(int)
    	df_final["Quantity"] = df_final["Quantity"].astype(int)
    	df_final["UnitPrice"] = df_final["UnitPrice"].astype(float)

    	for col in ["InvoiceNo", "StockCode", "Description", "Country"]:
        	df_final[col] = df_final[col].astype(str)

    	return df_final',
	FALSE, TRUE); -- V_GLOBAL, V_OVERWRITE
END;
/
You may be wondering why we are explicitly casting the data types. When you see statements such as .astype(int), there is a practical reason behind them. OML4Py must translate the columns in a Python DataFrame into clearly defined Oracle SQL data types, such as NUMBER or VARCHAR2.
If that mapping is left to assumption, problems can surface. Python tends to be flexible with types, while Oracle expects precision. Without clearly defining those types in advance, the database may raise conversion errors when it attempts to create or populate the table. That is why being as straightforward as possible here prevents unnecessary friction later.
Step 2: Convert Pandas DataFrame to Oracle SQL Types and Execute
With the logic now stored inside the database, the next step is to execute it. However, the goal is not simply to run the script once. We want the results to remain available for future use. To accomplish this, we rely on the pyqEval function.
This function is particularly useful when your Python script produces a dataset from scratch or pulls data from an external source, instead of querying an existing Oracle table. To make the output persistent, we embed pyqEval within a CREATE TABLE … AS SELECT statement. In doing so, we essentially build a clean, streamlined pipeline that generates and stores the data in a single operation.
Excel File -> Python Cleaning -> Oracle Table.
The Execution Command
CREATE TABLE ONLINE_RETAIL AS
SELECT * FROM pyqEval(
NULL, -- No additional parameters to pass
-- Define the Output Schema (JSON Format)
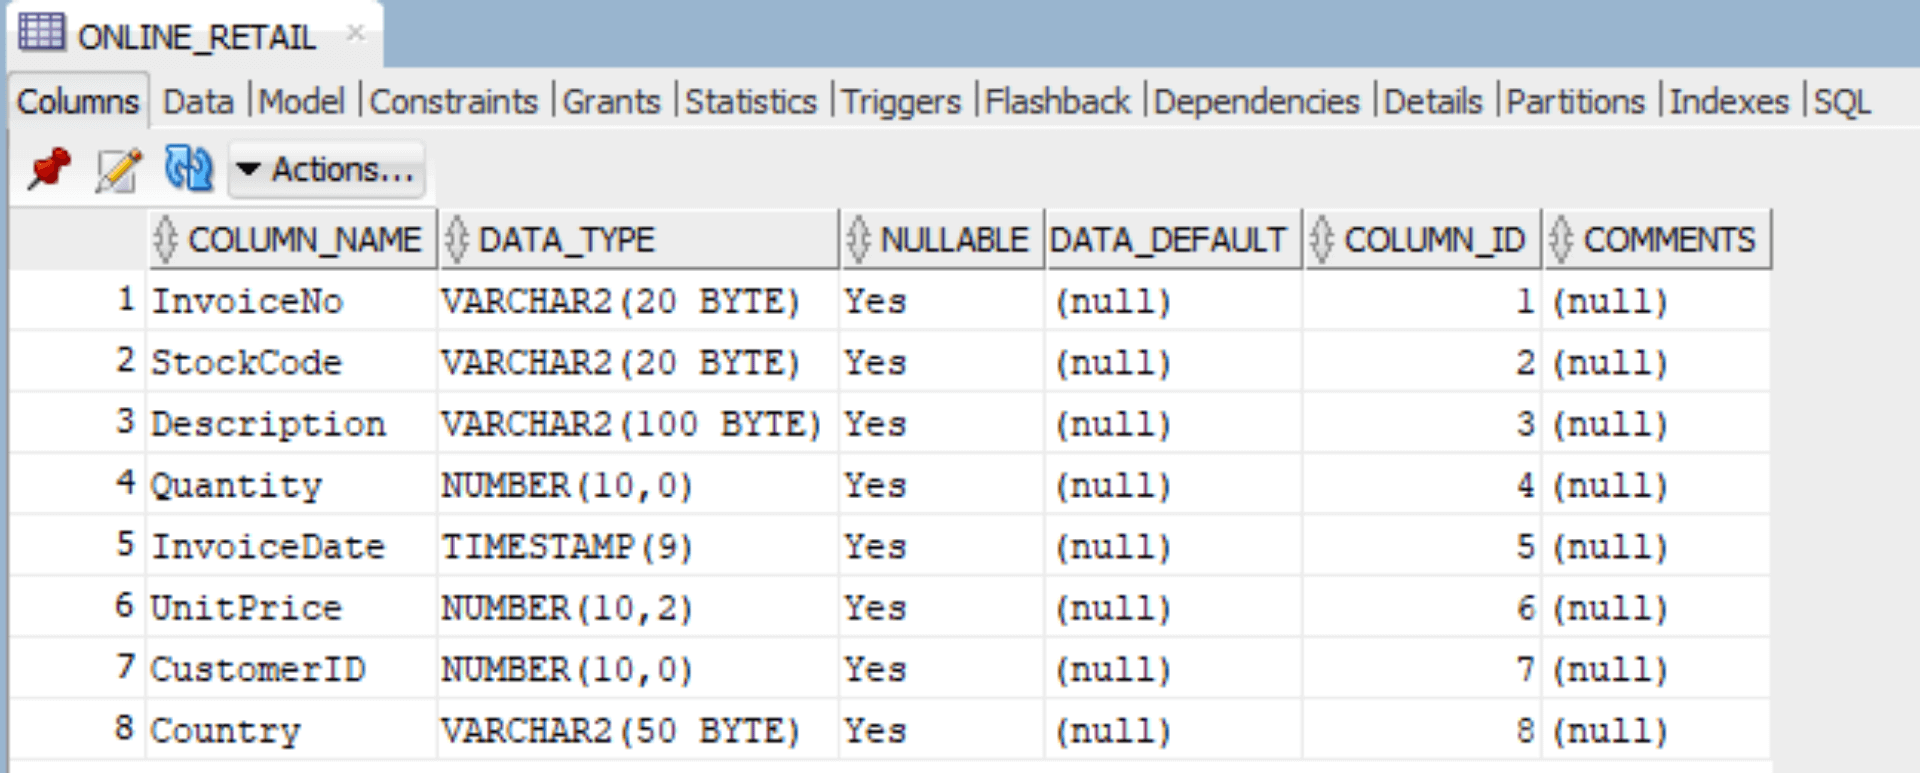
'{"InvoiceNo":"VARCHAR2(20)",
"StockCode":"VARCHAR2(20)",
"Description":"VARCHAR2(100)",
"Quantity":"NUMBER(10, 0)",
"InvoiceDate":"TIMESTAMP",
"UnitPrice":"NUMBER(10, 2)",
"CustomerID":"NUMBER(10, 0)",
"Country":"VARCHAR2(50)"}',
'create_online_retail_table' -- The script we created in Step 1
);
What Just Took Place?
- Data Loading: The database ran your embedded Python logic, which retrieved the Excel file directly from the /home/oracle/ directory.
- Type Alignment: The JSON definition included in the SQL statement linked each Python column to a corresponding Oracle data type. For example, UnitPrice was defined as NUMBER(10, 2), ensuring precision and consistency.
- Table Creation: The final dataset was written straight into the database and stored as the ONLINE_RETAIL table, making it immediately available for further analysis.
You now have a clean, typed, and accessible table called ONLINE_RETAIL residing comfortably in your database. By following this guide, you now know the most efficient way to load Excel files into an Oracle database using OML4Py without relying on manual CSV imports or complex SQL loaders.
But raw data is just the beginning. In Part 2, learn how to prepare this Oracle data for time-series forecasting using a powerful Prophet model.
If you require any assistance regarding automation, database management, or Oracle cloud hosting, please feel free to contact us at MaxAPEX.
I will see you in Part 2!