The hard work is done. Now, it’s time to cash in. A model is useless if it just sits there. In this final part, we will retrieve our trained AI model and put it to work. We’ll do 2 things mainly:
- Validation: We will force the model to predict the sales for the last 30 days using the TEST_SALES table (the test data we hid!).
- Forecasting: We will use the model to generate a 90-day sales forecast to guide real-world business decisions.
Step 1: Predicting score on Hidden Data
Before trusting any forecast, you must validate your model. Remember the SALES_TEST table we created in part 2 ? It holds the last 30 days of historical sales data that the Prophet model has never seen.
We will now instruct the model to “predict” for those 30 days, and the results will be saved. We can then compare the model’s predictions (yhat) against the actual sales (y) to view its performance.
Script A: Waking Up the Model (prophet_score)
This Python script is the workhorse of our validation step. It is responsible for loading the trained model from the Datastore, running the prediction, and merging the actual sales figures with the predicted ones.
BEGIN
sys.pyqScriptCreate(‘score_prophet_test’,
‘def score_prophet_model(dat, modelName, datastoreName):
import oml
from prophet import Prophet
import pandas as pd
# 1. Load the trained Prophet model from the Datastore
ds_objects = oml.ds.load(name=datastoreName, objs=[modelName], to_globals=False)
model = ds_objects[modelName]
# 2. Prepare the input data (SALES_TEST table)
# Rename columns to Prophets required “ds” and “y” (lowercase)
dat.columns = [col.lower() for col in dat.columns]
# 3. Make predictions using the test dates
test_dates = dat[[“ds”]]
forecast = model.predict(test_dates)
# 4. Merge Actuals and Predictions
# dat contains the actual “y” (sales) column
# forecast contains the prediction “yhat”
result_df = pd.merge(dat, forecast[[“ds”, “yhat”, “yhat_lower”, “yhat_upper”]], on=”ds”, how=”left”)
# 5. Prepare the final output DataFrame for SQL
final_output = result_df[[“ds”, “y”, “yhat”, “yhat_lower”, “yhat_upper”]]
# Rename columns for clarity in the final Oracle table
final_output.columns = [“FORECAST_DATE”, “ACTUAL_SALES”, “PREDICTED_SALES”, “LOWER_BOUND”, “UPPER_BOUND”]
return final_output’,
FALSE, TRUE);
END;
/

Executing Command: Saving the Test Results
We use pyqTableEval to feed the SALES_TEST table into the scoring script. Note the parameters are exactly the same as training, ensuring the script knows which model to load.
CREATE TABLE SALES_TEST_ACTUAL_VS_PRED AS
(SELECT * FROM table(pyqTableEval(
‘SALES_TEST’, — Input table
— JSON arguments
‘{“modelName”:”prophet_sales_forecast_model”, “datastoreName”:”prophet_sales_store”, “oml_connect”:1}’,
— Output specification using the relevant names
‘{“FORECAST_DATE”:”TIMESTAMP”,
“ACTUAL_SALES”:”NUMBER(15, 2)”,
“PREDICTED_SALES”:”NUMBER(15, 2)”,
“LOWER_BOUND”:”NUMBER(15, 2)”,
“UPPER_BOUND”:”NUMBER(15, 2)”}’,
— Python script name
‘score_prophet_test’
)));
/
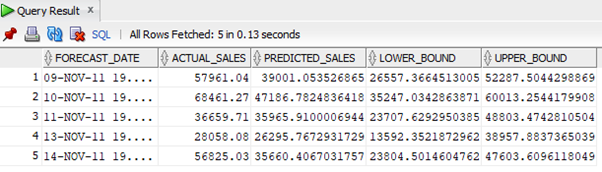
What just happened? The oml.ds.load() function retrieved the model you trained in Part 2. It then ran model.predict() on the test data. The resulting table, SALES_TEST_ACTUAL_VS_PRED, now contains the actual sales next to the predicted sales, ready for you to analyze! You can simply check what your model predicted vs the actual sales for your test data using a simple select SQL
SQL> SELECT * FROM SALES_TEST_ACTUAL_VS_PRED FETCH FIRST 5 ROWS ONLY;
Step 2: Generating the 90-Day Forecast
The ultimate goal for all of this is generating sales forecasts for dates that haven’t even happened yet. This information is vital for business planning, inventory management, and staffing.
Script B: The Crystal Ball (prophet_forecast)
This script is unique because it doesn’t need an input table. It uses a Prophet library’s built-in model.make_future_dataframe function. We tell it to start from the last date in our training data and generate 90 new days. After that It feeds those 90 future dates into the model to get the forecast.
BEGIN
sys.pyqScriptCreate(‘prophet_forecast’,
‘def prophet_forecast(periods, datastoreName, modelName):
import oml
from prophet import Prophet
# 1. Load the “Brain”
model_object = oml.ds.load(name=datastoreName, model=modelName)
model = model_object[modelName]
# 2. Generate future dates (The magic line!)
# periods: the number of days to forecast (e.g., 90)
# include_history: False means start AFTER the training data ends
future = model.make_future_dataframe(periods=periods, include_history=False)
# 3. Predict the future values
forecast = model.predict(future)
# 4. Prepare the final output
results = forecast[[“ds”, “yhat”, “yhat_lower”, “yhat_upper”]]
results.columns = [“FORECAST_DATE”, “PREDICTION”, “CONFIDENCE_LOWER”, “CONFIDENCE_UPPER”]
return results’,
FALSE, TRUE);
END;
/
SQL Command: Saving the Final 90-Day Forecast
Notice that we are using pyqEval here, not pyqTableEval. Why? Because the Python script does not need an input table—it generates its own future dates internally using the model.make_future_dataframe function . For that we pass the periods:90 parameter in the JSON string to tell the script how far out to look.
CREATE TABLE SALES_FUTURE_FORECAST_90D AS
(SELECT * FROM table(pyqEval(
NULL, — No input table needed, dates are generated inside the Python script
— PAR_LST: Model details, oml_connect, and setting periods=90
‘{“modelName”:”prophet_sales_forecast_model”, “datastoreName”:”prophet_sales_store”, “periods”:90, “oml_connect”:1}’,
— OUT_FMT: Output specification matching the new column names
‘{“FORECAST_DATE”:”TIMESTAMP”, “PREDICTED_SALES”:”NUMBER(15, 2)”, “LOWER_BOUND”:”NUMBER(15, 2)”, “UPPER_BOUND”:”NUMBER(15, 2)”}’,
— Script name
‘prophet_forecast’
)));
/
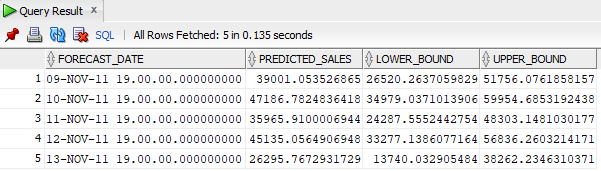
Now we have the predictions for next 90 days saved in the table SALES_FUTURE_FORECAST_90D which we can have a look with a simple select SQL
SQL> SELECT * FROM SALES_FUTURE_FORECAST_90D FETCH FIRST 5 ROWS ONLY;
Congratulations!
If you’ve followed this three-part series then you have successfully completed a full, enterprise-grade time-series machine learning project entirely within the Oracle Database using OML4Py.
Your final table, SALES_FUTURE_FORECAST_90D, now contains your predictions for the next three months, complete with upper and lower confidence bounds to give you a clear picture of the expected sales range. This data is instantly available for reporting, dashboards, and advanced SQL analysis.
You now have a powerful, scalable foundation for future ML projects. Go forth and predict with confidence!
You Are Now a Database-Powered Data Scientist!
Happy forecasting!
If you require any assistance regarding automation, please feel free to contact us.